Today’s mission was to get more familiar with Azure Storage Tables and to manage them with PowerShell. On GitHub I found the AzureTableEntity module from Tao Yang. Below are a number of code snippets I used to get my hands dirty with Azure Storage tables and the module.
Install the Module
Install-Module -Name AzureTableEntity
Next we create an Azure Resource Group and an Azure Storage Account
# Create ResourceGroup
$Location = "Westeurope"
$ComputerInventory_ResourceGroup = "rg_CompComputerInventory"
New-AzureRmResourceGroup -Name $ComputerInventory_ResourceGroup -Location $Location
# Create StorageAccount
$SkuName = "Standard_LRS"
$ComputerInventory_StorageAccountName = "sacomputerinventory"
New-AzureRmStorageAccount -ResourceGroupName $ComputerInventory_ResourceGroup -Name $ComputerInventory_StorageAccountName -SkuName "$SkuName" -Location $Location,
```powershell
We will need the Storage Account key later so let’s get that one as well.
```powershell
# Retrieve the first StorageAccountAccessKey
$StorageAccount = Get-AzureRmStorageAccount -ResourceGroupName $ComputerInventory_ResourceGroup -Name $ComputerInventory_StorageAccountName
$StorageAccountAccessKey = (Get-AzureRmStorageAccountKey -ResourceGroupName $ComputerInventory_ResourceGroup -Name $ComputerInventory_StorageAccountName).Value[0]
```powershell
Next we create a new Table with the name “Computerinventory”
```powershell
#Create Table
$TableName = "ComputerInventory"
$context = New-AzureStorageContext -StorageAccountName $ComputerInventory_StorageAccountName -StorageAccountKey $StorageAccountAccessKey
New-AzureStorageTable -Name $TableName -Context $context
```powershell
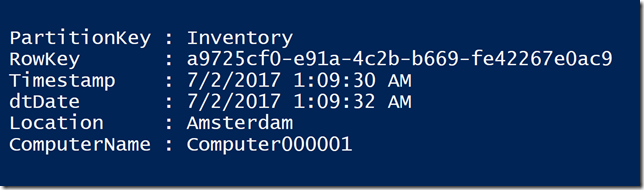
Now that we have the table created, we can start adding data to it, let’s start with adding just one row first.
```powershell
# Add one entry
$data = @{
RowKey = ([guid]::NewGuid().tostring())
PartitionKey = "Inventory"
ComputerName = "Computer000001"
Location = "Amsterdam"
dtDate = [datetime]::UtcNow
}
New-AzureTableEntity -StorageAccountName $ComputerInventory_StorageAccountName -StorageAccountAccessKey $StorageAccountAccessKey -TableName $TableName -Verbose -Entities $data
```powershell
Let’s take a look what’s in the table now
```powershell
$querystring = "(PartitionKey eq 'Inventory')"
$result = Get-AzureTableEntity -TableName $tableName -StorageAccountName $ComputerInventory_StorageAccountName -StorageAccountAccessKey $StorageAccountAccessKey -QueryString $querystring -ConvertDateTimeFields $true -GetAll $true -Verbose
$result
```powershell
Next let’s add some more data to it, the below code creates some random computer inventory data.
# Generate some demo data for PC inventory
```powershell
$locations = @("Amsterdam","Paris","Stockholm","London","New York","Seatle","Singapure","Hong Kong","The Hague","Barcelona","Madrid","Stockholm","Rome")
$data = @()
$count = 2
While ($count -le 100)
{
$obj = @{
RowKey = ([guid]::NewGuid().tostring())
PartitionKey = "Inventory"
ComputerName = "Computer" + $count.ToString("000000")
Location = ($locations)[(Get-Random -Minimum 0 -Maximum $locations.Count )]
dtDate = [datetime]::UtcNow
}
$data += (New-Object -TypeName PSCustomObject -Property $obj)
$count++
}
```powershell
# Add rows to Azure Storage Table
```powershell
New-AzureTableEntity -StorageAccountName $ComputerInventory_StorageAccountName -StorageAccountAccessKey $StorageAccountAccessKey -TableName $TableName -Verbose -Entities $data
```powershell
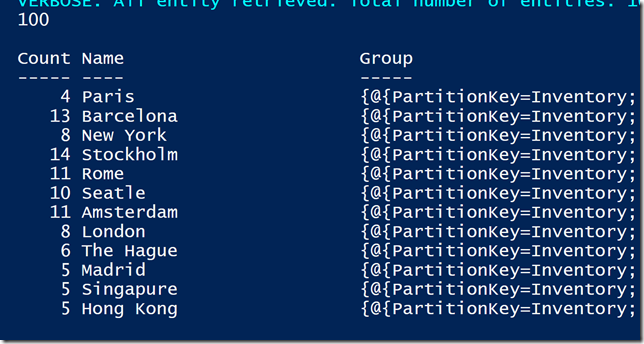
If all went fine, we should now have all the data in the table.
```powershell
$querystring = "(PartitionKey eq 'Inventory')"
$result = Get-AzureTableEntity -TableName $tableName -StorageAccountName $ComputerInventory_StorageAccountName -StorageAccountAccessKey $StorageAccountAccessKey -QueryString $querystring -ConvertDateTimeFields $true -GetAll $true -Verbose
$result.Count
$result | Group-Object Location
```powershell
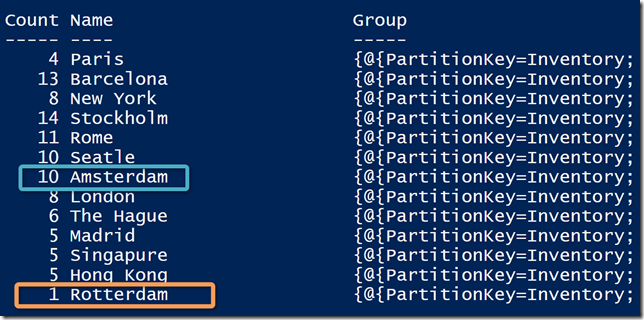
We now have 100 records in the table, with “**11**” computers located in Amsterdam
Now let’s look at Computer000001
```powershell
$querystring = "(ComputerName eq 'Computer000001')"
$result = Get-AzureTableEntity -TableName $tableName -StorageAccountName $ComputerInventory_StorageAccountName -StorageAccountAccessKey $StorageAccountAccessKey -QueryString $querystring -ConvertDateTimeFields $true -GetAll $true -Verbose
$result
```powershell
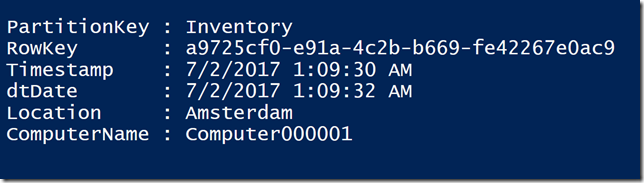
It’s located in Amsterdam. Now let’s have a look at how to update a record, let’s say we want to change it to “Rotterdam”
```powershell
$NewLoczation = "Rotterdam"
$data = @{
PartitionKey = $result.PartitionKey
RowKey = $result.RowKey
Location = $NewLoczation
ComputerName = $result.ComputerName
dtDate = $result.dtDate
}
Update-AzureTableEntity -StorageAccountName $ComputerInventory_StorageAccountName -StorageAccountAccessKey $StorageAccountAccessKey -TableName $TableName -Entities $data
```powershell
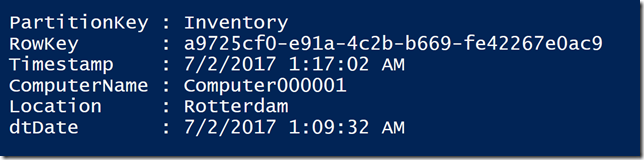
Let's retrieve the record again.
```powershell
$querystring = "(ComputerName eq 'Computer000001')"
$result = Get-AzureTableEntity -TableName $tableName -StorageAccountName $ComputerInventory_StorageAccountName -StorageAccountAccessKey $StorageAccountAccessKey -QueryString $querystring -ConvertDateTimeFields $true -GetAll $true -Verbose
$result
```powershell
and there we go, it's now registered in Rotterdam.
Let’s query the entire database again.
```powershell
$querystring = "(PartitionKey eq 'Inventory')"
$result = Get-AzureTableEntity -TableName $tableName -StorageAccountName $ComputerInventory_StorageAccountName -StorageAccountAccessKey $StorageAccountAccessKey -QueryString $querystring -ConvertDateTimeFields $true -GetAll $true -Verbose
$result.Count
$result | Group-Object Location
```powershell
and finally, let’s remove the Computer000001
I query the information again, as i will re-use the return values to build the remove properties.
```powershell
$querystring = "(ComputerName eq 'Computer000001')"
$result = Get-AzureTableEntity -TableName $tableName -StorageAccountName $ComputerInventory_StorageAccountName -StorageAccountAccessKey $StorageAccountAccessKey -QueryString $querystring -ConvertDateTimeFields $true -GetAll $true -Verbose
$Remove = @{
PartitionKey = $result.PartitionKey
RowKey = $result.RowKey
Computername = $result.ComputerName
}
Remove-AzureTableEntity -StorageAccountName $ComputerInventory_StorageAccountName -StorageAccountAccessKey $StorageAccountAccessKey -TableName $TableName -Entities $Remove
If you followed my example, you should now have 99 rows left.
I hope you enjoyed this blog post, as always comments and feedback are welcome.
Further reading and useful resources: